how to draw 3d square pattern
In this tutorial, we'll larn the essentials of how to depict vector shapes in Photoshop CS6 with its easy-to-use shape tools!
Nosotros'll start past learning how to describe basic geometric shapes using the Rectangle Tool, the Rounded Rectangle Tool, the Ellipse Tool, the Polygon Tool, and the Line Tool. We'll learn how to choose fill up and stroke colors for the shapes, how to change the advent of the stroke, how to edit the shapes subsequently thanks to the flexibility of Shape layers, and more! There's a lot to comprehend, so this tutorial will focus on everything we demand to know about these five geometric shape tools. In the next tutorial, we'll larn how to add more circuitous shapes to our documents using Photoshop'due south Custom Shape Tool!
This tutorial is for Photoshop CS6 users. If you're using an older version of Photoshop, you'll want to check out the original Shapes And Shape Layers Essentials tutorial.
Most people remember of Photoshop as a pixel-based image editor, and if you were to ask someone to recommend a expert vector-based drawing program, Adobe Illustrator would usually be at the acme of their list. It'south true that Photoshop doesn't share all of Illustrator's features, but as we'll meet in this and other tutorials in this serial, information technology's various shape tools make Photoshop more capable of adding simple vector-based artwork to our designs and layouts!
If yous're not sure what a vector shape is and how it differs from a pixel-based shape, be certain to check out the previous tutorial in this series, Drawing Vector vs Pixel Shapes in Photoshop CS6.
Drawing Vector Shapes In Photoshop
The Shape Tools
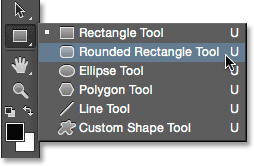
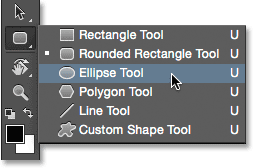
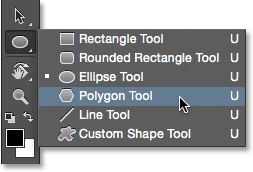
Photoshop gives us six shape tools to choose from - the Rectangle Tool, the Rounded Rectangle Tool, the Ellipse Tool, the Polygon Tool, the Line Tool, and the Custom Shape Tool, and they're all nested together in the same spot in the Tools panel. By default, the Rectangle Tool is the i that'due south visible, but if we click and hold on the tool'south icon, a fly-out bill of fare appears showing us the other tools we can cull from:
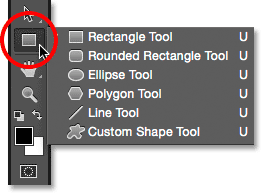
Clicking and holding on the Rectangle Tool icon reveals the other shape tools hiding behind it.
I'll start by selecting the starting time ane in the list, the Rectangle Tool:
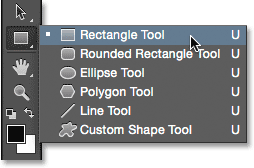
Selecting the Rectangle Tool.
Shapes, Pixels Or Paths
Before we draw any shapes, we first need to tell Photoshop which kind of shape we want to describe. That's considering Photoshop actually lets united states of america draw three very different kinds of shapes. We can draw vector shapes, paths, or pixel shapes. We'll wait more closely at the differences between the three in other tutorials, but as we've already learned in the Drawing Vector vs Pixel Shapes tutorial, in about cases you lot'll desire to be drawing vector shapes. Unlike pixels, vector shapes are flexible, scalable and resolution-contained, which ways we can draw them any size we like, edit and scale them as much as we want, and even print them at any size without any loss in quality! Whether nosotros're viewing them on screen or in print, the edges of vector shapes e'er remain crisp and abrupt.
To make sure you lot're drawing vector shapes, not paths or pixels, select Shape from the Tool Mode option in the Options Bar along the pinnacle of the screen:
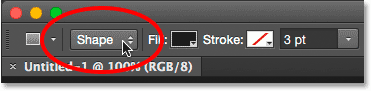
Setting the Tool Mode option to Shape.
Filling The Shape With Color
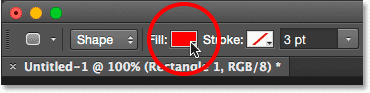
The next thing we'll usually want to do is choice a color for the shape, and in Photoshop CS6, we do that by clicking on the Fill color swatch in the Options Bar:

Clicking the Fill up colour swatch.
This opens a box that lets us choose from four different ways to make full the shape, each represented by one of four icons along the elevation. Starting from the left, we have the No Colour icon (the 1 with the red diagonal line through it), the Solid Color icon, the Slope icon, and the Pattern icon:
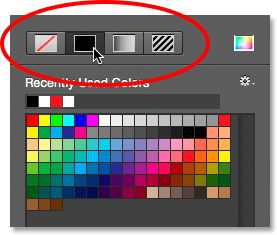
The four options for filling the shape (No Color, Solid Color, Slope, and Pattern).
No Color
As its name implies, selecting No Color on the left will leave the shape completely empty. Why would you desire to leave a shape empty? Well, in some cases, you may want your shape to contain only a stroke outline. We'll encounter how to add a stroke in a few moments, only if you desire your shape to comprise but a stroke, with no make full color at all, select No Colour:
The No Colour option will leave the shape empty.
Here's a quick example of what a shape with no fill color looks like. All we're seeing is the bones outline of the shape, known as the path. The path is only visible in Photoshop, then if yous were to impress your document or salvage your work in a format like JPEG or PNG, the path would not exist visible. To make information technology visible, we'd need to add a stroke to information technology, which nosotros'll be learning how to practice later we've covered the Fill options:

Just the path of the shape is visible (and just in Photoshop) when Fill is set to No Color.
Solid Color
To fill your shape with a solid color, choose the Solid Color option (second from left):
Clicking the Solid Color fill pick.
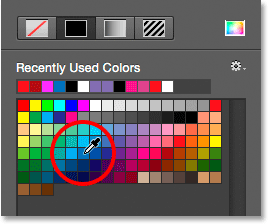
With Solid Color selected, choose a color for the shape by clicking on i of the colour swatches. Colors y'all've used recently will appear in the Recently Used Colors row above the primary swatches:
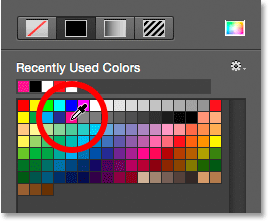
Choosing a color by clicking on a swatch.
If the color yous demand is non found in any of the swatches, click the Colour Picker icon in the upper right of the box:
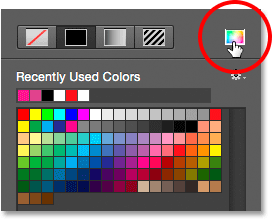
Clicking the Color Picker icon.
Then, cull the color you need from the Colour Picker. Click OK to shut out of the Color Picker when you're washed:
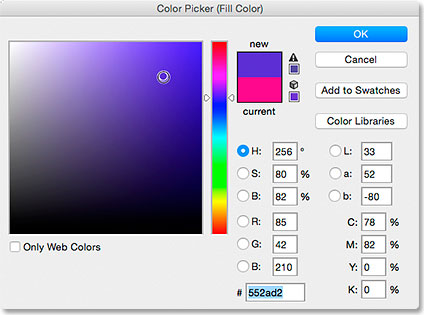
Choosing a make full color for the shape from the Color Picker.
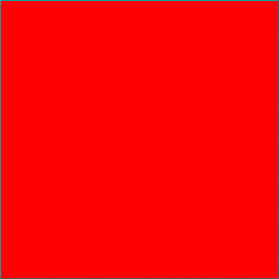
Here's the same shape every bit earlier, this time filled with a solid color:

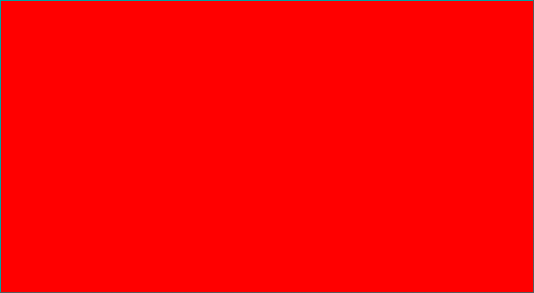
A bones shape filled with a solid color.
Slope
To fill your shape with a gradient, cull the Gradient option. Then, click on one of the thumbnails to select a preset slope, or use the options beneath the thumbnails to create your ain. We'll learn all about creating and editing gradients in a separate tutorial:
Choosing the Gradient option at the top, then selecting a preset gradient.
Hither's the same shape filled with a slope:
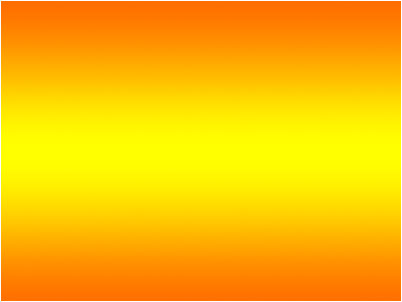
The shape filled with one of Photoshop'due south preset gradients.
Blueprint
Finally, choosing the Pattern option lets us fill the shape with a design. Click on i of the thumbnails to select a preset pattern. Photoshop doesn't requite us many patterns to choose from initially, but if y'all've created your own or downloaded some off the net, you can load them in by clicking on the pocket-sized gear icon (below the Color Picker icon) and choosing Load Patterns from the carte:
Choosing the Pattern selection, then selecting a preset pattern.
Here's what the shape looks like filled with one of Photoshop'south preset patterns. To close out of the Fill colour options box when y'all're washed, printing Enter (Win) / Return (Mac) on your keyboard, or click on an empty spot in the Options Bar. If you lot're not sure which color, gradient or pattern you need for your shape, don't worry. As we'll see, yous tin can ever come back and modify it later:

The shape filled with a preset design.
Adding A Stroke Around The Shape
Past default, Photoshop volition not add together a stroke around the edges of your shape, but adding one is just equally easy equally adding a fill color. In fact, the options for Stroke and Fill in Photoshop CS6 are exactly the aforementioned, so you lot already know how to use them!
To add together a stroke, click on the Stroke color swatch in the Options Bar:
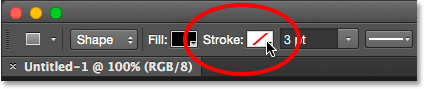
Clicking the Stroke color swatch.
This opens a box giving us the exact same options that nosotros saw with the fill color, except this time we're choosing a color for our stroke. Along the top, we accept the same 4 icons for choosing between No Colour, Solid Color, Gradient, or Blueprint. By default, the No Colour option is selected. I'll choose Solid Color, and then I'll set blackness equally my stroke color by choosing it from the swatches. As with the fill color, if the color you need for your stroke is non found in the swatches, click the Color Picker icon in the upper correct to manually cull the colour y'all need:
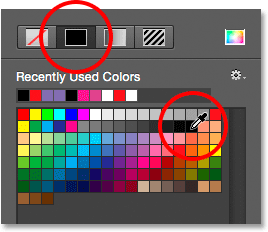
Selecting the Solid Colour option for the stroke, then choosing a color from the swatches.
Irresolute The Width Of The Stroke
To change the width of the stroke, utilize the Stroke Width option straight to the right of the Stroke colour swatch in the Options Bar. By default, it's prepare to 3 pt. To change the width, you can either enter a specific value direct into the box (press Enter (Win) / Return (Mac) on your keyboard when you're done to accept it), or click on the small-scale pointer to the right of the value and drag the slider:
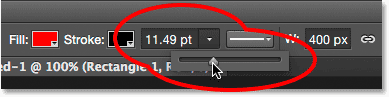
Changing the width of the stroke.
The Align Edges Option
If you look farther to the right in the Options Bar, you'll see an pick called Align Edges. With this option turned on (checked), Photoshop will make sure the edges of yous vector shape are aligned with the pixel filigree, which keeps them looking well-baked and abrupt:

You'll commonly desire to brand certain Align Edges is checked.
However, for Align Edges to work, non simply does information technology need to exist selected, but yous also need to prepare the width of your stroke in pixels (px), non points (pt). Since my stroke width is currently using points (the default measurement type), I'll go back and enter a new width of 10 px:
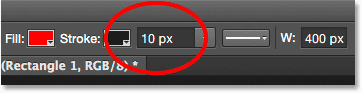
For Marshal Edges to piece of work, prepare your stroke width in pixels (px).
Here's an example of a black, 10 px stroke practical to the shape:
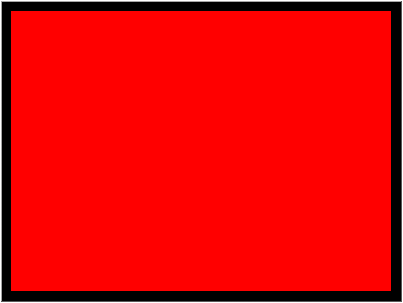
A unproblematic shape with a black stroke surrounding it.
Now that I've added a stroke, if I go back and click on the Fill color swatch in the Options Bar and change the fill to No Color, I'm left with just the stroke outline. The inside of the shape is empty. It looks similar it's filled with white only considering the background of my document is white, so what we're actually seeing is the document's background:

The same shape, now with Make full set to No Color.
More Stroke Options
By default, Photoshop draws the stroke every bit a solid line, merely nosotros can change that by clicking the Stroke Options button in the Options Bar:

Clicking the Stroke Options push.
This opens the Stroke Options box. From here, we can change the stroke blazon from a solid line to a dashed or dotted line. The Align option lets us choose whether the stroke should fall inside the path outline, outside the path or be centered on the path. Nosotros can set the Caps option to Butt, Round or Square, and change the Corners to either Miter, Circular or Bevel. Clicking the More Options button at the bottom volition open a more detailed box where you tin fix specific dash and gap values, and even relieve your settings as a preset:
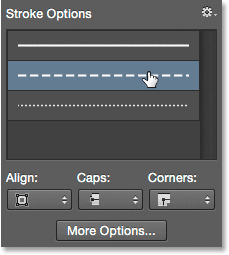
The Stroke options.
Here'southward the aforementioned stroke equally before, this time every bit a dashed rather than a solid line:

The stroke type changed from solid to dashed.
Shortcodes, Actions and Filters Plugin: Error in shortcode [ads-nuts-centre]
The Rectangle Tool
Now that we know how to select Photoshop's various shape tools from the Tools panel, how to choose a fill and stroke color and how to change the advent of the stroke, allow'southward acquire how to actually describe vector shapes! We'll get-go with the first tool in the list, the Rectangle Tool. I'll select it from the Tools panel just as I did earlier:
Selecting the Rectangle Tool.
The Rectangle Tool lets usa draw simple four-sided rectangular shapes. To draw one, start past clicking in the document to set a starting betoken for the shape. Then, keep your mouse button held down and drag diagonally to draw the rest of the shape. As you lot drag, you lot'll see simply a thin outline (known as the path) of what the shape will look like:
Dragging out a rectangle shape. As you elevate, just an outline of the shape appears.
When you release your mouse button, Photoshop fills the shape with the colour you selected in the Options Bar:
Photoshop fills the shape with color when you release your mouse push button.
Resizing The Shape After You've Fatigued It
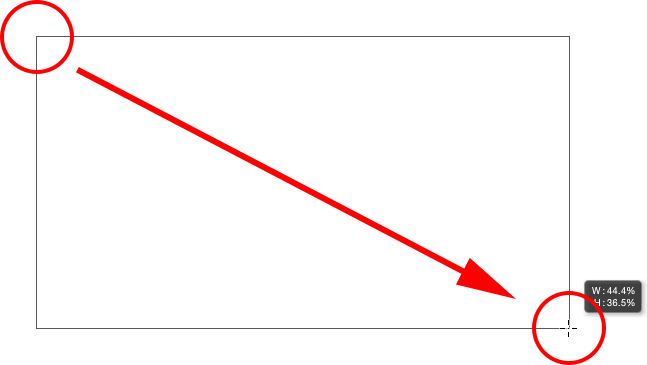
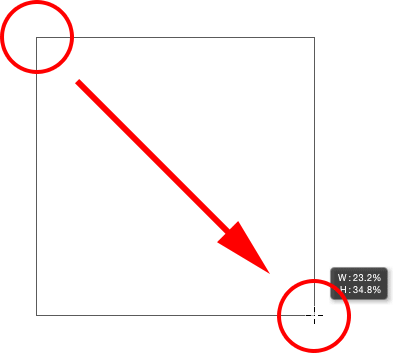
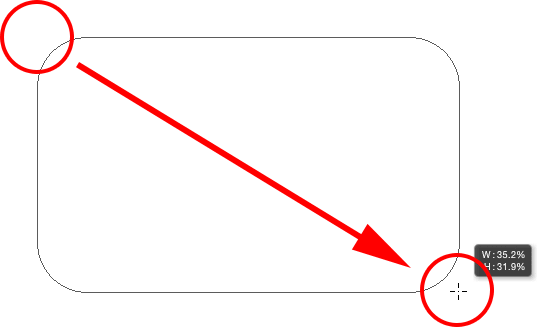
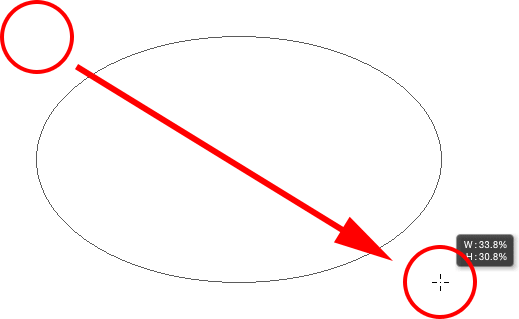
Once y'all've drawn your initial shape, its current dimensions will appear in the Width (W) and Height (H) boxes in the Options Bar. Here, we see that my shape was drawn 533 px wide and 292 px high:
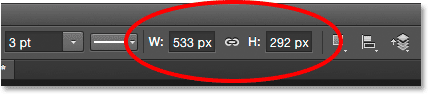
The Options Bar showing the initial width and height of the shape.
If you demand to resize the shape subsequently you've fatigued information technology (and this works for all the shape tools, not just the Rectangle Tool), simply enter the dimensions you need into the Width (Due west) and Height (H) fields. For example, let's say what I really needed was for my shape to be exactly 500 px wide. All I demand to practise is modify the width value to 500 px. I could also enter a specific height if needed. If you lot want to modify either the width or the peak merely keep the original aspect ratio of your shape intact, kickoff click on the small link icon betwixt the width and height values:
Employ the link icon to maintain the aspect ratio of the shape when resizing it.
With the link icon selected, entering a new width or height tells Photoshop to automatically change the other one to maintain the aspect ratio. Here, I've manually entered a new width of 500 px, and considering I had the link icon selected, Photoshop inverse the meridian to 273 px:
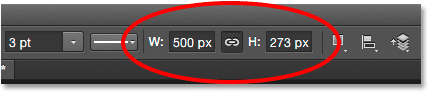
Resizing the shape.
Choosing The Size Before You Draw The Shape
If you lot happen to know the exact width and summit you demand for your shape before you describe it, here's a play a joke on. With your shape tool selected, simply click inside your document. Photoshop volition pop open a dialog box where you tin enter in your width and height values. Click OK to shut out of the dialog box and Photoshop will automatically draw the shape for y'all:
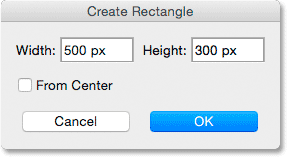
Click in one case inside the document to enter a width and height, then let Photoshop depict the shape.
Drawing A Shape From Its Heart
Here's a few simple yet very useful keyboard shortcuts. If you printing and hold the Alt (Win) / Selection (Mac) key on your keyboard as you're dragging out the shape, you'll depict it from its eye rather than from the corner. This works with whatever of Photoshop's shape tools, not only the Rectangle Tool. Information technology's very important, though, that you wait until after you've started dragging before pressing the Alt / Option fundamental, and that you keep the cardinal held downwards until subsequently you've released your mouse button, otherwise it won't piece of work:
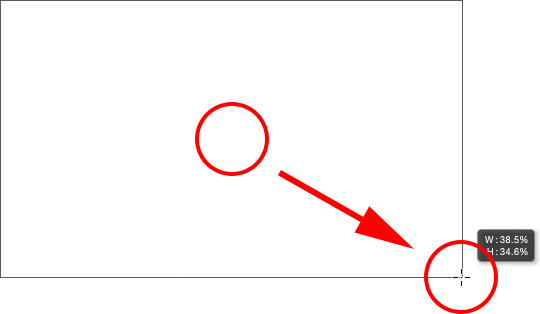
Press and hold Alt (Win) / Option (Mac) to describe a shape from its center.
Drawing Squares
To draw a perfect square with the Rectangle Tool, click within the document to set a starting point and begin dragging as usual. In one case you've started dragging, press and hold the Shift key on your keyboard. This forces the rectangle into a perfect square. Again, brand sure you wait until afterward you've started dragging before pressing your Shift primal, and keep it held downwards until afterwards you've released your mouse button or it won't work. You tin besides combine these 2 keyboard shortcuts together by pressing and property Shift+Alt (Win) / Shift+Pick (Mac) as you elevate with the Rectangle Tool, which will force the shape into a perfect square and describe information technology out from the eye:
Press and concord Shift as you lot drag to draw a square.
Over again, you'll come across only a path outline of the foursquare as y'all're dragging, but when y'all release your mouse button, Photoshop fills information technology with your chosen color:
Photoshop always waits until you lot release your mouse button before filling the shape with color.
The Shape Options
If you lot look up in the Options Bar, to the left of the Align Edges option, you'll see a gear icon. Clicking this icon opens a box with additional options for whichever shape tool you currently have selected:
Clicking the gear icon.
Since I have the Rectangle Tool selected, clicking the gear icon shows me options for the Rectangle Tool. With the exception of the Polygon Tool and the Line Tool, both of which we'll look at subsequently, you lot won't find yourself using this menu very often because we've already learned how to admission near of these options from the keyboard. For instance, the Unconstrained option lets us freely depict shapes at whatever dimensions nosotros need, only since it's the default beliefs of the shape tools, there's no need to select it. The Square option allows u.s.a. to draw perfect squares with the Rectangle Tool, simply we can already practice that by pressing and holding the Shift key. And From Center will describe the shape from its center, but again, we tin already do that by pressing and holding Alt (Win) / Option (Mac).
If you lot select either the Fixed Size or Proportional options and enter width and height values, they will affect the next shape you depict, not one you've already drawn. Also, y'all'll demand to recall to come back and reselect the Unconstrained option when y'all're washed, otherwise every shape you depict from that point on will exist set to the same size or proportions:
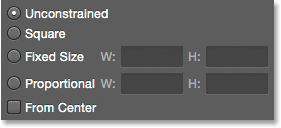
The options you lot meet volition depend on which shape tool is selected.
Editing Shape Layers
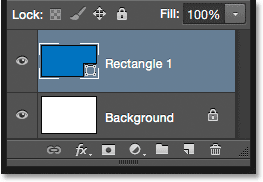
Before, we learned that to draw vector shapes in Photoshop, we demand to make sure we have the Tool Manner option in the Options Bar ready to Shapes (as opposed to Path or Pixels). When we depict a vector shape, Photoshop automatically places it on a special type of layer known equally a Shape layer. If we expect in my Layers panel, we meet that the shape I've drawn with the Rectangle Tool is sitting on a shape layer named "Rectangle one". The name of the layer will change depending on which shape tool was used, so if I had drawn a shape with, say, the Ellipse Tool, it would be named "Ellipse i":
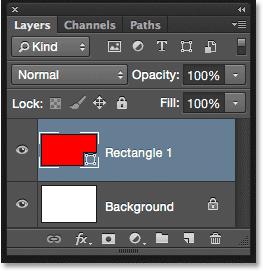
Each new vector shape y'all draw appears on its own Shape layer.
An easy manner to tell the divergence between a Shape layer and a normal pixel layer is that Shape layers have a small shape icon in the lower right corner of the preview thumbnail:
The icon in the preview thumbnail tells us it's a Shape layer.
The master departure between a Shape layer and a normal pixel layer is that Shape layers remain fully editable. Back when nosotros were learning how to cull fill and stroke colors for our shapes, I mentioned that we tin can ever come back and change the colors after we've drawn the shape. All we need to do is make sure we accept the Shape layer selected in the Layers panel, and that we withal take our shape tool selected from the Tools console. Then, simply click on either the Fill or Stroke color swatch in the Options Bar to cull a unlike color. You tin as well change the stroke width if needed, along with the other stroke options. I'll click on my Fill color swatch:
Clicking the Fill color swatch with the Shape layer selected.
Then I'll cull a different colour for my shape from the swatches:
Clicking a blueish colour swatch.
Every bit soon as I click on the swatch, Photoshop instantly updates the shape with the new color:

The color of the shape has been changed without needing to redraw it.
And, if we look again in the Layers panel, we come across that the preview thumbnail for the Shape layer has also been updated with the new color:
The shape preview in the Layers panel also updates when we make changes.
The Rounded Rectangle Tool
Let's look at the second of Photoshop's shape tools, the Rounded Rectangle Tool. I'll select it from the Tools panel:
Selecting the Rounded Rectangle Tool.
The Rounded Rectangle Tool is very like to the standard Rectangle Tool except that it lets u.s. draw rectangles with rounded corners. We control the roundness of the corners using the Radius pick in the Options Bar. The college the value, the more rounded the corners will announced. You need to set the Radius value earlier drawing your shape, so I'll set mine to 50 px:

Use the Radius option to control the roundness of the corners.
Once you've set your radius, drawing a rounded rectangle is exactly the same as drawing a normal rectangle. Start by clicking within the certificate to ready a starting indicate for the shape, and so keep your mouse button held down and drag diagonally to draw the balance of it. Just as we saw with the Rectangle Tool, Photoshop will brandish merely the path outline of the shape as you're dragging:
Dragging out a rounded rectangle subsequently setting the Radius value in the Options Bar.
When you release your mouse button, Photoshop completes the shape and fills it with color:

The shape is filled with color when you release your mouse button.
Hither'southward another instance of a rounded rectangle, this fourth dimension with my Radius value set to 150 px, large plenty (in this example anyway) to brand the unabridged left and correct sides of the rectangle appear curved:
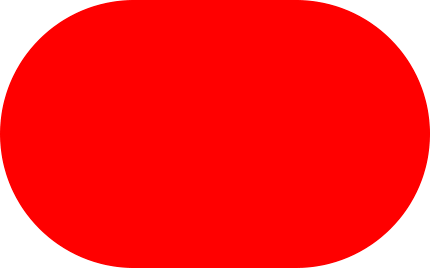
A higher Radius value produces more rounded corners.
And here's a rectangle but with a much lower Radius value of only ten px, giving me very small rounded corners:

A smaller Radius value gives us less rounded corners.
Unfortunately, in Photoshop CS6, there's no way to preview how rounded the corners will appear with our chosen Radius value earlier nosotros actually describe the rectangle. Also, we tin't adjust the Radius value on the fly while we're drawing the shape, and Photoshop doesn't let us go back and brand changes to the Radius value after it's been drawn. All of this means that cartoon rounded rectangles is very much a "trial and error" situation.
If y'all draw a rounded rectangle and decide you're not happy with the roundness of the corners, all you can really do is go up to the Edit menu in the Menu Bar along the pinnacle of the screen and choose Undo Rounded Rectangle Tool (or press Ctrl+Z (Win) / Command+Z (Mac) on your keyboard) which will remove the rounded rectangle from the document. Then, enter a different Radius value into the Options Bar and effort again:
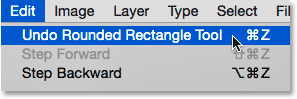
Going to Edit > Undo Rounded Rectangle Tool.
The same keyboard shortcuts that we learned about for the standard Rectangle Tool also apply to the Rounded Rectangle Tool. To strength the shape into a perfect square (with rounded corners), begin dragging out the shape, then press and hold your Shift key. Release the Shift cardinal merely subsequently you've released your mouse button.
To draw a rounded rectangle from its middle rather than from the corner, brainstorm dragging out the shape, then press and hold your Alt (Win) / Option (Mac) primal. Finally, pressing and holding Shift+Alt (Win) / Shift+Option (Mac) will forcefulness the shape into a perfect square and draw it out from the middle. Release the keys only afterward you lot've released your mouse button.
The Ellipse Tool
Photoshop's Ellipse Tool lets us depict elliptical or round shapes. I'll select it from the Tools panel:
Selecting the Ellipse Tool.
Merely as with the other shape tools we've looked at, to draw an elliptical shape, click within the document to gear up a starting bespeak, then keep your mouse button held down and drag diagonally to describe the rest of it:
Drawing an elliptical shape with the Ellipse Tool.
Release your mouse button to complete the shape and have Photoshop make full it with your chosen color:
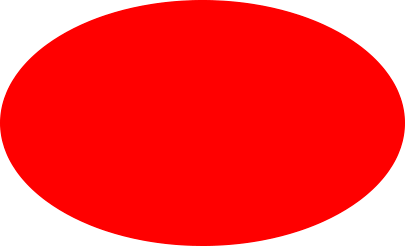
The colour-filled shape.
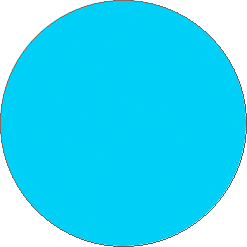
To draw a perfect circle with the Ellipse Tool, begin dragging out the shape, then press and hold your Shift key. To draw an elliptical shape out from its heart, printing and hold Alt (Win) / Option (Mac) after you kickoff dragging. Pressing and holding Shift+Alt (Win) / Shift+Option (Mac) will draw a perfect circle out from its center. Every bit always, release the keys but after you've released your mouse button:
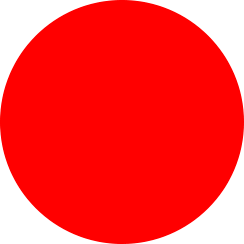
A circle fatigued with the Ellipse Tool.
The Polygon Tool
The Polygon Tool is where things get-go to become interesting. I'll select it from the Tools panel:
Selecting the Polygon Tool.
While Photoshop'due south Rectangle Tool is express to drawing four-sided polygons, the Polygon Tool lets u.s. draw polygonal shapes with equally many sides as nosotros like! Information technology even lets us draw stars, every bit nosotros'll run across in a moment. To draw a shape with the Polygon Tool, first enter the number of sides you lot need into the Sides pick in the Options Bar. You tin can enter any number from 3 to 100. I'll leave mine set to the default value of 5 for now:
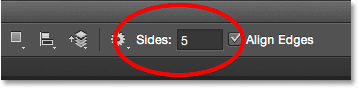
Enter the number of sides y'all need into the Sides option.
Once yous've entered the number of sides, click in the document and elevate out your shape. Photoshop always draws polygon shapes out from their center then at that place'south no need to concur down your Alt (Win) / Selection (Mac) key. Holding your Shift key downwards after you starting time dragging will limit the number of angles at which the shape tin exist drawn, which tin assist position the shape the way you lot need it:

A v-sided shape fatigued with the Polygon Tool.
Setting the Sides pick to iii in the Options Bar gives us an like shooting fish in a barrel way to depict a triangle:
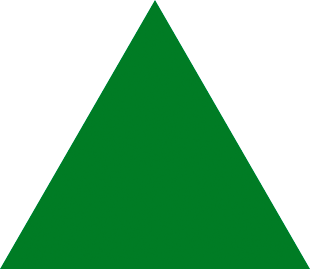
A simple triangle drawn with the Polygon Tool.
And here's a polygon shape with Sides set to 12. Like the Radius option for the Rounded Rectangle Tool, Photoshop does not permit us change the number of sides once nosotros've drawn our shape, so if you made a error, you'll need to become up to the Edit carte at the summit of the screen and choose Undo Polygon Tool (or press Ctrl+Z (Win) / Command+Z (Mac)), then enter a dissimilar value into the Sides option and redraw the shape:

A twelve-sided polygon shape.
Drawing Stars With The Polygon Tool
To draw stars with the Polygon Tool, click on the gear icon in the Options Bar, then select Star:
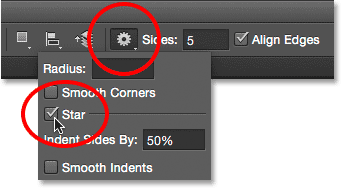
Clicking the gear icon and choosing Star.
So, just click inside the document and drag out a star shape. With Star selected, the Sides option in the Options Bar controls the number of points in the star, so at its default value of v, we get a five-pointed star:

A 5-pointed star drawn with the Polygon Tool.
Changing the Sides value to eight gives us an 8-pointed star:

Command the number of points with the Sides selection.
Nosotros can create a starburst shape past increasing the Indent Sides By option beyond its default value of 50%. I'll increase it to 90%. I'll also increment my Sides value to 16:
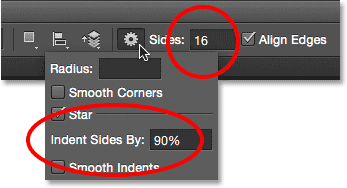
Creating a starburst by increasing the Indent Sides By value.
And here's the result:

A starburst drawn with the Polygon Tool.
By default, stars have precipitous corners on the ends of their points, but nosotros can make them rounded by choosing the Smooth Corners option:
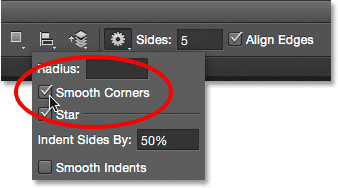
Turning on Smooth Corners.
Here'due south a standard v-pointed star with the Smooth Corners selection enabled:

The Smooth Corners option gives stars a fun, friendly look to them.
We can smooth the indents as well and brand them rounded past selecting the Polish Indents option:
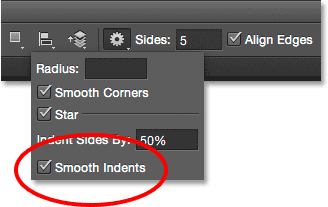
Turning on Smooth Indents.
With both Smooth Corners and Smooth Indents selected, we get more of a starfish shape:

A star with Smooth Corners and Smooth Indents turned on.
The Line Tool
The terminal of Photoshop'south basic geometric shape tools is the Line Tool. I'll select it from the Tools console:
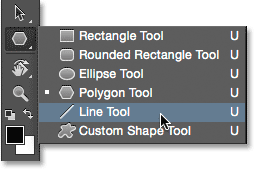
Selecting the Line Tool.
The Line Tool allows us to draw simple direct lines, but we can likewise use it to draw arrows. To draw a directly line, first, ready the thickness of the line by entering a value, in pixels, into the Weight field in the Options Bar. The default value is one px. I'll increase it to xvi px:
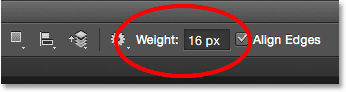
The Weight option controls the thickness, or width, of the line.
Then, as with the other shape tools, click inside the document and drag out your line. To brand it easier to depict a horizontal or vertical line, hold down your Shift primal subsequently you offset dragging, then release the Shift key afterward you release your mouse button:
Agree Shift as y'all elevate to draw horizontal or vertical lines.
Drawing Direction Arrows
To describe arrows, click on the gear icon in the Options Bar to open the Arrowheads options. Choose whether you want the arrowhead to appear at the start of the line, the terminate, or both (if you lot want the arrow to face the same management in which the line is existence drawn, cull Cease):
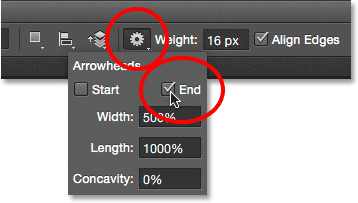
Click the gear icon to access the Arrowhead options.
Here'due south a line similar to the i drawn previously, this time with an arrowhead on the finish:
The Line Tool makes it easy to draw direction arrows.
If the default size of the arrowhead doesn't work for y'all, you tin arrange information technology by irresolute the Width and Length options. Yous can also make the arrowhead appear more concave by increasing the Concavity option. I'll increment it from its default value of 0% to fifty%:

Change the shape of the arrowhead by increasing its concavity.
Here's what the arrowhead at present looks like. Make sure you change the Line Tool options before you lot draw your shape since they can't be adjusted afterwards (if you demand to make changes, yous'll need to undo the shape and first over):

An arrowhead with a Concavity value to l%.
Hiding The Path Outline Around The Shape
As nosotros've seen throughout this tutorial, whenever we draw a shape using any of the shape tools, Photoshop displays simply the path outline while the shape is being drawn. When we release our mouse push button, that's when Photoshop completes the shape and fills it with color. Problem is, if you await closely after cartoon the shape, you'll run across that the path outline is all the same at that place surrounding it. Hither, we tin see the thin black outline surrounding the shape. This isn't a big deal considering the outline volition not print or announced in any saved file format like JPEG or PNG, only it can withal be abrasive to await at while you lot're working.
The path outline is still visible even after the shape is drawn.
To hide the path outline in Photoshop CS6, merely printing Enter (Win) / Render (Mac) on your keyboard and it disappears:

Press Enter (Win) / Return (Mac) and the outline is gone.
Where to go next...
And in that location we take it! That'southward the essentials of drawing basic geometric vector shapes in Photoshop CS6 using the Rectangle Tool, The Rounded Rectangle Tool, the Ellipse Tool, the Polygon Tool, and the Line Tool! In the next tutorial, we'll learn how to add more complex and interesting shapes to your designs and layouts using Photoshop's Custom Shape Tool! Visit our Photoshop Basics section to learn more than about Photoshop!
schumanndreff1937.blogspot.com
Source: https://www.photoshopessentials.com/basics/how-to-draw-vector-shapes-in-photoshop-cs6/
Post a Comment for "how to draw 3d square pattern"